This article show a guide on how to update BMW 5 and 7 series (E60,E61,E65,E66) DVB-T for advanced DVD system.The installation time is approx 1.0 to 1.5 hours, but this may vary depending on the model the condition of the car and the equipment in it.
And for more BMW retrofit,you can check here:BMW Retrofit Projects
2024.08 BMW Rheingold ISTA+ 4.48.40 4.23.14 ISTA-P 3.71 Free Download
Retrofit kit No.
65 12 0 415 063 DVB-T upgrade kit for Advanced DVD system E60
65 12 0 415 064 DVB-T upgrade kit for Advanced DVD system E61
65 12 0 415 065 DVB-T upgrade kit for Advanced DVD system E65, E66
Note:These installation instructions are only applicable to cars with Advanced DVD system.
Important information
These installation instructions are primarily designed for use within the BMW dealership organisation and by authorised BMW service companies.
In any event the target group for these installation instructions is specialist personnel trained on BMW cars with the appropriate specialist knowledge.
All work must be completed using the latest BMW repair manuals, circuit diagrams, servicing manuals and work instructions in a rational order using the prescribed tools (special tools) and observing current health and safety regulations.
To avoid unnecessary extra work and/or costs, if any installation or function problems occur, after a brief troubleshooting session (approx. 0.5 hours), contact the following:
1.Either your national subsidiary or your regional office
2.The Support team via the Aftersales Assistance Portal (ASAP) using the optional technical parts support application.
Specify the chassis number and the part number of the installed retrofit kit and give a precise
description of the problem.
Do not archive the hard copy of these installation instructions since daily updates are made by ASAP.
Pictograms
Denotes instructions that draw your attention to dangers.
Denotes instructions that draw your attention to special features.
Denotes the end of the instruction or other text.
Subject to technical modifications!
Installation information
Ensure that the cables/lines are not kinked or damaged as you install them in the car.
The costs incurred as a result of this will not be reimbursed by BMW AG.
Additional cables/lines that you install must be secured with cable ties.
If the specified PIN chambers are occupied, bridges, double crimps or twin-lead terminals must be used.
All the figures show LHD cars, proceed in exactly the same way on RHD cars.
List of special equipment
The following special equipment must be taken into consideration when installing the upgrade kit:
SA 653 I-BOC
Special tools required
00 9 317, Trim wedge
Contents
3.Installation and cabling diagram for E60 cars
4.Installation and cabling diagram for E61 cars
5.Installation and cabling diagram for E65 and E66 cars
6.To connect the retrofit cable for E60 cars
7.To connect the retrofit cable for E61 cars
8.To connect the retrofit cable for E65 and E66 cars
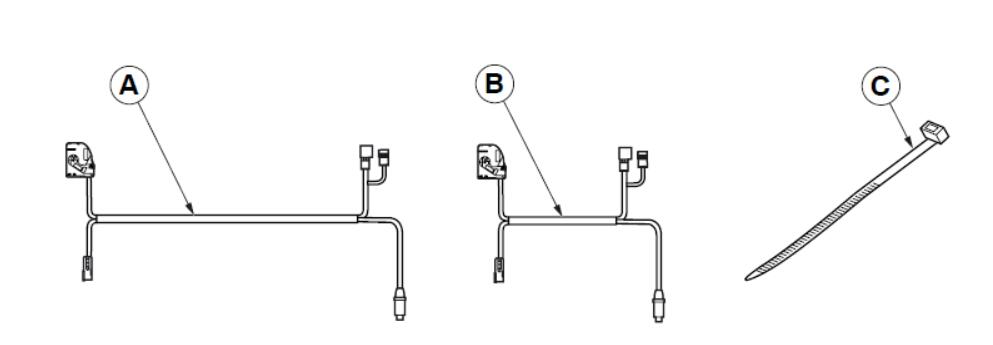
Legend
Only the parts required for the electrical connection of the set-top box are listed. All the other parts contained
in the kit are described in the installation instructions headed “DVB-T set-top box”.�
A Retrofit cable (for E61, E65 and E66 cars)
B Retrofit cable (for E60 cars)
C Cable tie (10x)
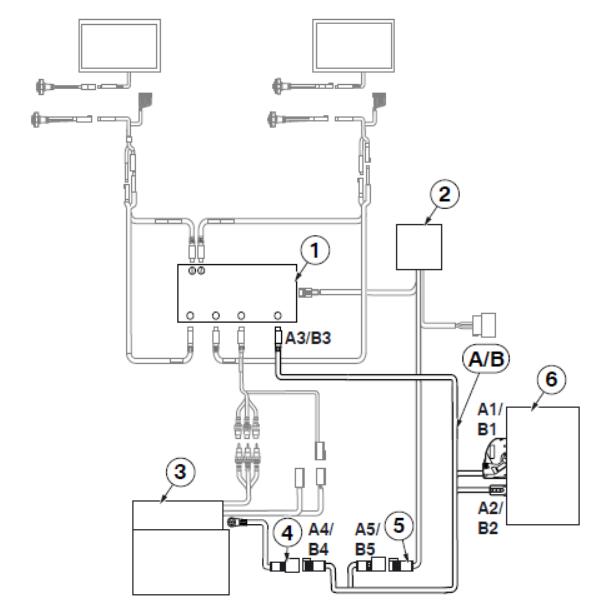
Legend
The connections for branches A1/B1 and A2/B2 are described in the installation instructions headed “DVBT
set-top box”.
A/B Retrofit cable
A1/B1 26-pin socket casing SW
A2/B2 6-pin socket casing SW
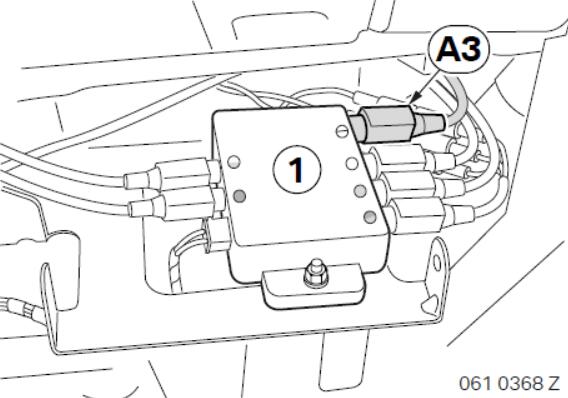
A3/B3 8-pin round plug, SW
A4/B4 WS 3-pin socket casing
A5/B5 WS 3-pin plug casing
1 AV switcher
2 Voltage supply
3 Multimedia changer
4 WS 3-pin plug casing
5 WS 3-pin socket casing
6 Set-top box
3.Installation and cabling diagram for E60 cars
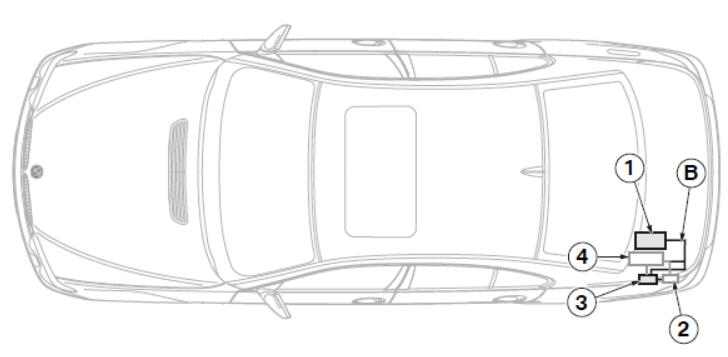
Legend
B Retrofit cable
1 Set-top box
2 Voltage supply
3 AV switcher
4 Multimedia changer
4.Installation and cabling diagram for E61 cars
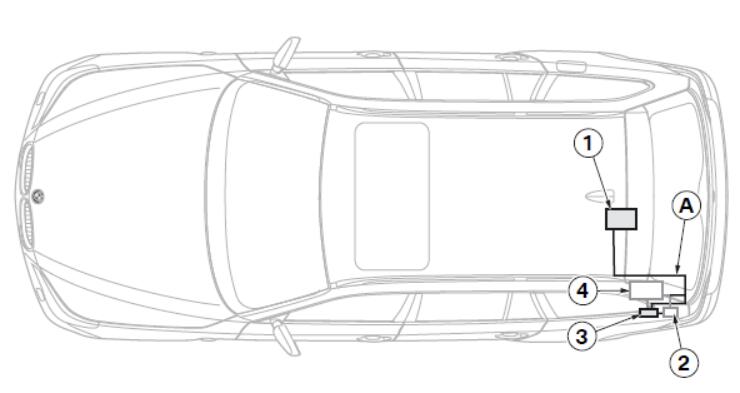
Legend
A Retrofit cable
1 Set-top box
2 Voltage supply
3 AV switcher
4 Multimedia changer
5.Installation and cabling diagram for E65 and E66 cars
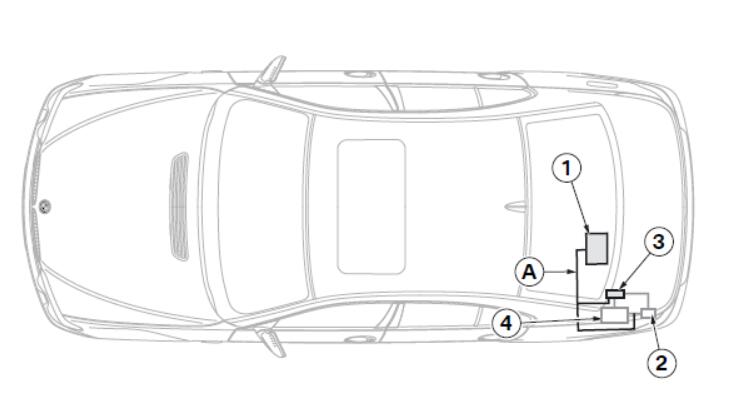
Legend
A Retrofit cable
1 Set-top box
2 Voltage supply
3 AV switcher
4 Multimedia changer
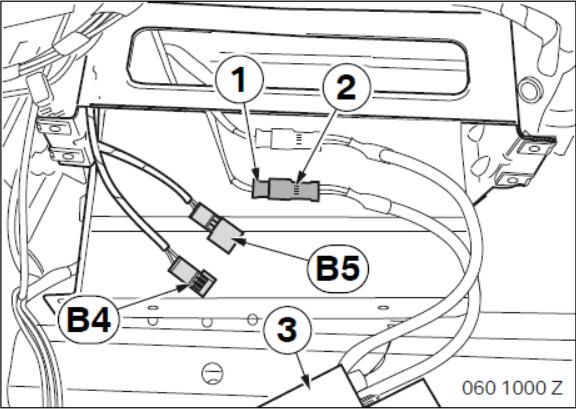
6.To connect the retrofit cable for E60 cars
Disconnect plugs (1 and 2), 3-pin WS for the voltage supply to the multimedia changer (3).
Connect branch B4, 3-pin WS socket casing, to plug (2).
Connect branch B5, 3-pin WS plug casing, to plug (1).
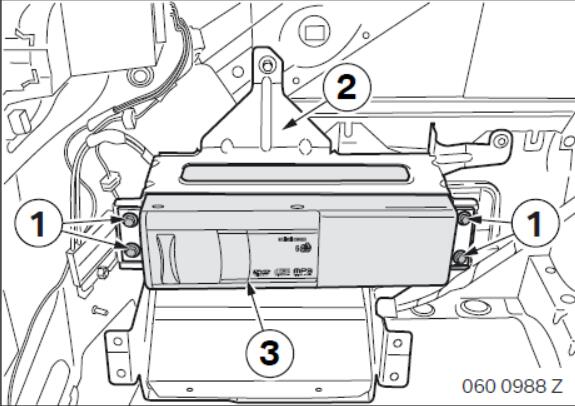
Insert the multimedia changer (3) into the holder (2) and secure it with screws (1).
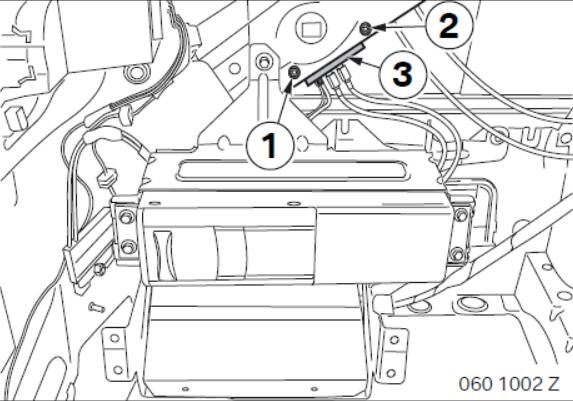
Undo hexagonal nuts (1 and 2) on the AV switcher (3).
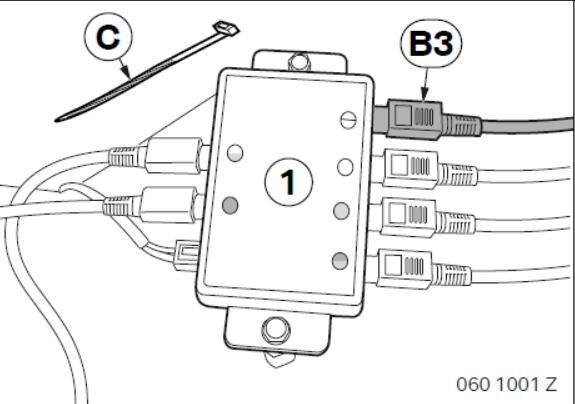
Route branch B3, 8-pin round plug, to the AV switcher (1) and connect it to the same colour mating plug.
Secure AV switcher (1) in the car.
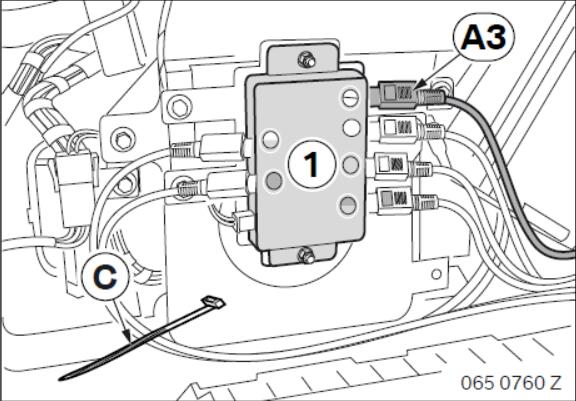
Secure the retrofit cable to the standard wiring harness using cable ties C.
7.To connect the retrofit cable for E61 cars
Cars without SA 653 only
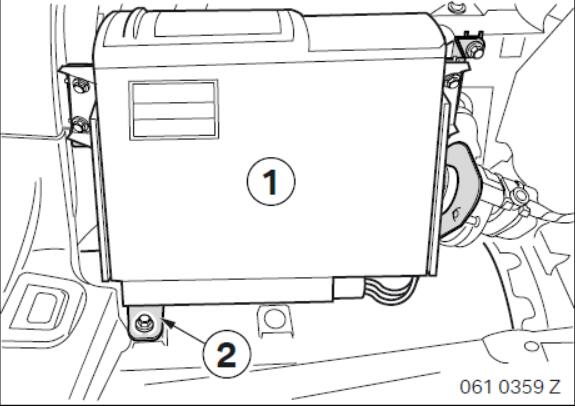
Release the multimedia changer (1).
Undo the holder (2) and tilt it inwards.
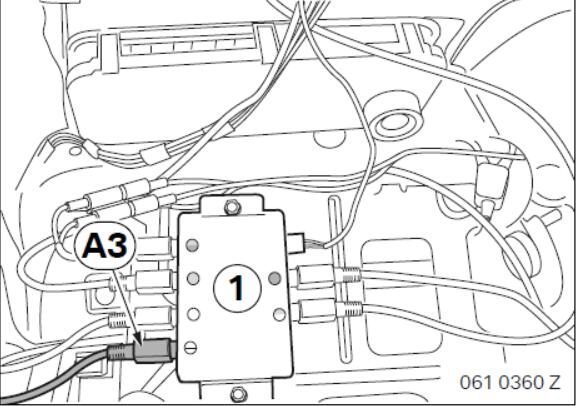
Route branch A3, 8-pin round plug, along the standard wiring harness to the AV switcher (1) and connect it to the same colour mating plug.
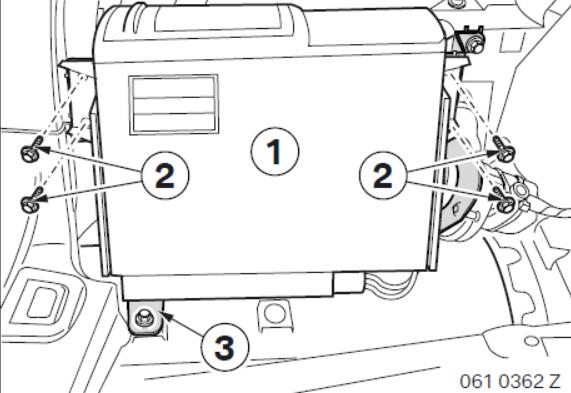
Secure the holder (3) in the car.
Secure the multimedia changer (1) with screws (2).
Cars with SA 653 only
Route branch A3, 8-pin round plug, along the standard wiring harness to the AV switcher (1) and connect it to the same colour mating plug.
7.To connect the retrofit cable for E61 cars
All cars
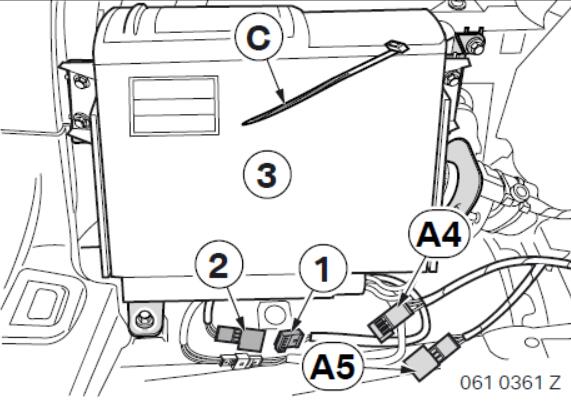
Disconnect plugs (1 and 2), 3-pin WS for the voltage supply to the multimedia changer (3).
Connect branch A4, 3-pin WS socket casing, to plug (2).
Connect branch A5, 3-pin WS plug casing, to plug (1).
Secure the retrofit cable to the standard wiring harness using cable ties C.
8.To connect the retrofit cable for E65 and E66 cars
Release the multimedia changer (3).
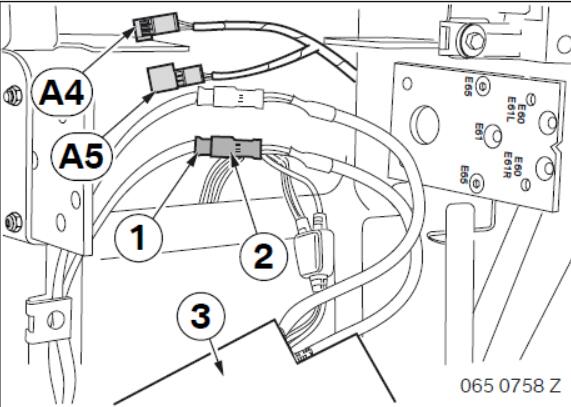
Disconnect plugs (1 and 2), 3-pin WS for the voltage supply to the multimedia changer.
Connect branch A4, 3-pin WS socket casing, to plug (2).
Connect branch A5, 3-pin WS plug casing, to plug (1).
Insert the multimedia changer (1) and secure it.
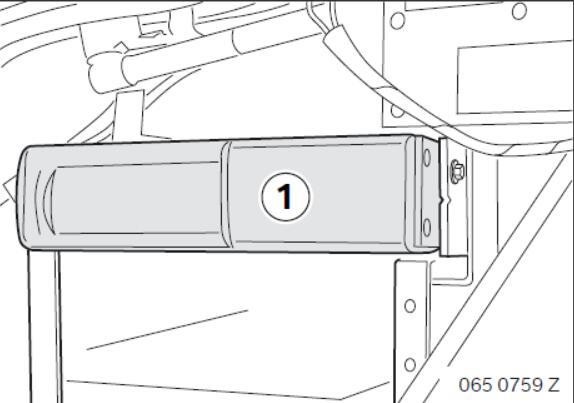
Route branch A3 to the AV switcher (1) and connect it to the same colour mating plug.
Secure the retrofit cable to the standard wiring harness using cable ties C.
This retrofit system does not require coding.
– Connect the battery
– Conduct a brief test
– Conduct a function test
– Re-assemble the car
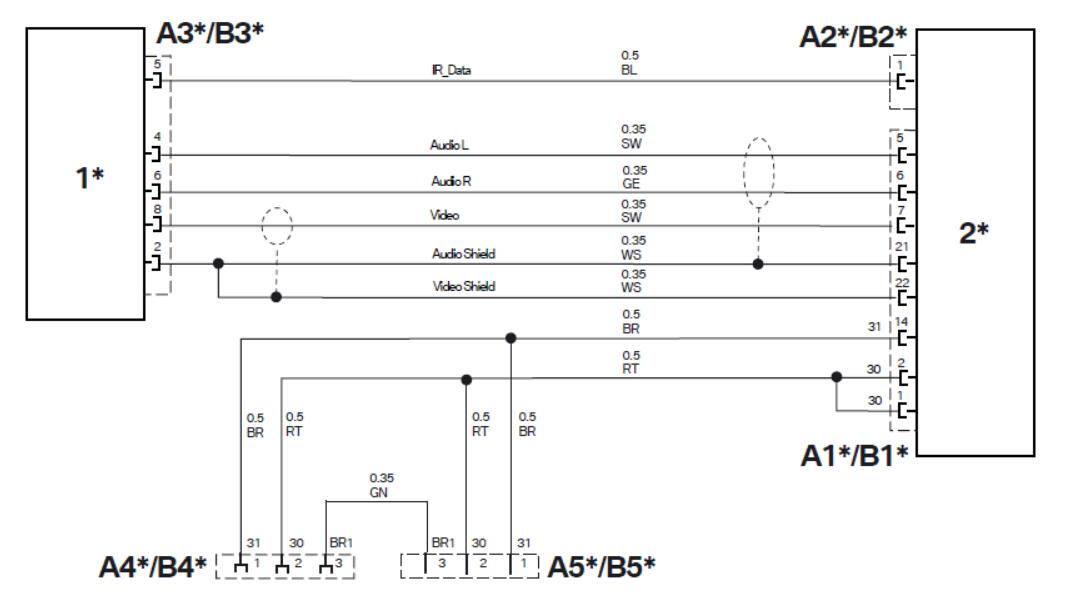
Legend
A1*/B1* 26-pin socket casing SW
A2*/B2* 6-pin socket casing SW
A3*/B3* 8-pin round plug, SW
A4*/B4* WS 3-pin socket casing
A5*/B5* WS 3-pin plug casing
1* AV switcher
2* Set-top box
All the designations marked with an asterisk (*) apply only to these installation instructions or this circuit diagram.
Cable colours
BL Blue
BR Brown
GE Yellow
GN Green
RT Red
SW Black
WS White