This instruction show you guide on how to diagnostics and repair HINO 600 series trucks P0071 outside temperature sensor trouble.
Preparations:
2024.03 HINO Diagnostic Explorer DX3/DX2 Diagnostic Software Free Download
HINO Trucks EPC Electronic Parts Catalog 2018 2016 Free Download
Procedures:
Step 1:Inspect the ambient air temperature sensor connector
Check the connection of the ambient air temperature sensor connector (Looseness and poor contact).
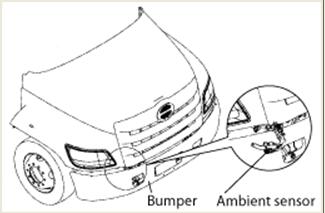
Was any failure found?
Yes,connect securely,repair if needed.Perform “After-inspection work” of information section
No,go to Step 2
Step 2:Inspect the connector of the external resistor
Check the connection of the external resistor connector (Looseness and poor contact).
Was any failure found?
Yes,connect securely,repair if needed.Perform “After-inspection work” of information section
No,go to step 3
Step 3:Inspect the DCU 86P connector
Check the connection of the DCU 86P connector (Looseness and poor contact).
Was any failure found?
Yes,connect securely,repair if needed.Perform “After-inspection work” of information section
No,go to step 4
Step 4:Inspect the ambient air temperature sensor
1.Check the installation of the ambient air temperature sensor.
2.Make sure there is no dirt or damage to the ambient air temperature sensor.
Was any failure found?
Yes,clean the ambient air temperature sensor and install it properly.If damaged,replace the ambient air temperature.Perform “After-inspection work” of information section
No,go to step 5
Step 5:Inspect the ambient air temperature sensor unit
1.Set the starter switch to the “LOCK” position.
2.Disconnect the ambient air temperature sensor connector.
3.Use the electrical tester to measure the resistance between the terminals of the ambient air temperature sensor.
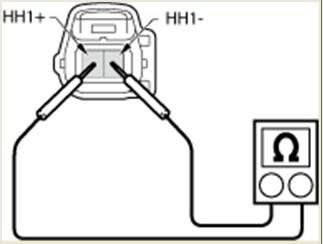
Measuring condition:Starter switch:LOCK
Measurement area:Ambient air temperature sensor HH1+-HH1-
Standard value:25°C[1.7KΩ]
Do the measurements meet the standard value?
Yes,Go to step 6
No,replace the ambient air temperature sensor.Perform “After-inspection work” of information section
Step 6:Inspect the external resistor unit
1.Disconnect the external resistor connector.
2.Use the electrical tester to measure the resistance between the terminals of the external resistor.
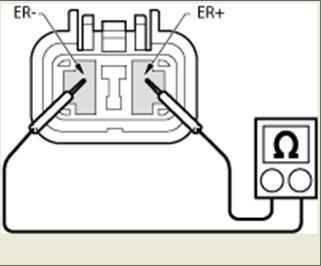
Measuring condition:Starter switch:LOCK
Measurement area:External resistor ER+-ER-
Standard value:2KΩ
Do the measurements meet the standard value?
Yes,go to step 7
No,replace the external resistor.Perform “After-inspection work” of information section
Step 7:Inspect the sensor power supply
1.Connect the external resistor connector.
2.Set the starter switch to the “ON” position.
3.Use the electrical tester to measure the voltage between the terminals of the ambient air temperature sensor vehicle-side connector.
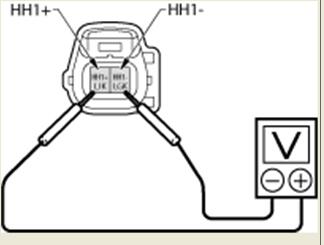
Measuring condition:Starter switch:ON
Measurement area:Ambient air temperature sensor vehicle-side connector HH1+-HH1-
Standard value:4.5-5.5V
Step 8:Inspect for short-circuit in the ambient air temperature sensor harness
1.Set the starter switch to the “LOCK” position.
2.Disconnect the DCU 86P connector.
3.Connect the signal check harness and use the electrical tester to measure the resistance between the terminals of the DCU 86P vehicle-side connector and the ground.
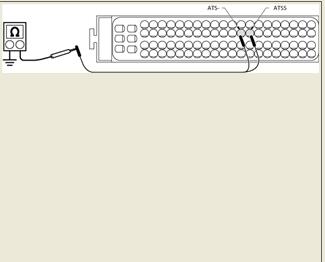
Measuring condition:Starter switch:LOCK
Measurement area:DCU 86P vehicle-side connector,ATSS-Ground,ATS–Ground
Standard value:∞Ω
Do the measurements meet the standard value?
Yes,go to step 9
No,repair or replace the harness.Perform “After-inspection work” of information section
Step 9:Inspect for disconnections of the ambient air temperature sensor harness
1.Connect the ambient air temperature sensor connector.
2.Connect the signal check harness and use the electrical tester to measure the resistance between the terminals of the DCU 86P vehicle-side connector.
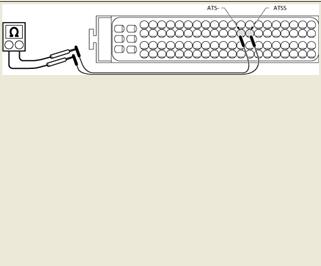
Measuring condition:Starter switch:LOCK
Measurement area:DCU 86P vehicle-side connector,ATSS-,ATS-
Standard value:25°C[3.7KΩ]
Yes,go to step 10
No,repair or replace the harness.Perform “After-inspection work” of information section
Step 10:Inspect the engine coolant temperature sensor connector
Check the connection of the engine coolant temperature sensor connector (Looseness and poor contact).
Was any failure found?
Yes,connect securely,repair if needed.Perform “After-inspection work” of information section
No,go to step 11
Step 11:Inspect the engine coolant temperature sensor
1.Check the installation of the engine coolant temperature sensor.
2.Make sure there is no dirt or damage to the engine coolant temperature sensor.
Was any failure found?
Yes,clean the engine coolant temperature sensor and install it properly.If damaged,replace the engine coolant temperature sensor.Perform “After-inspection work” of information section
No,go to step 12
Step 12:Inspect the engine coolant temperature sensor unit
1.Disconnect the engine coolant temperature sensor connector.
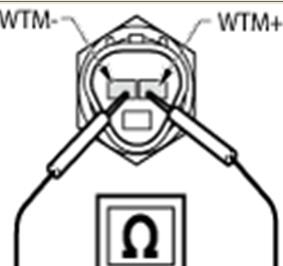
2.Use the electrical tester to measure the resistance between the terminals of the engine coolant temperature sensor.
Measuring condition:Starter switch:LOCK
Measurement area:Engine coolant temperature sensor WTM+-WTM-
Standard value:20°C[2.59-2.32KΩ],80°C[0.326-0.310KΩ]
Do the measurements meet the standard value?
Yes,go to step 13
No,replace the engine coolant temperature sensor.Perform “After-inspection work” of information section
Step 13:Inspect the exhaust gas temperature sensor (SCR inlet) connector
Check the connection of the exhaust gas temperature sensor (SCR inlet) connector (Looseness and poor contact).
Was any failure found?
Yes,connect securely,repair if needed.Perform “After-inspection work” of information section
No,go to step 14
Step 14:Inspect the exhaust gas temperature sensor (SCR inlet)
Check the installation of the exhaust gas temperature sensor (SCR inlet).
Make sure there is no dirt or damage to the exhaust gas temperature sensor (SCR inlet).
Was any failure found?
Yes,clean the exhaust gas temperature sensor and install it properly.If damaged,replace the exhaust gas temperature sensor (SCR inlet).Perform “After-inspection work” of information section.
No,go to step 15
Step 15:Inspect the exhaust gas temperature sensor (SCR inlet) unit
1.Set the starter switch to the “LOCK” position.
2.Disconnect the exhaust gas temperature sensor (SCR inlet) connector.
3.Use the electrical tester to measure the resistance between the terminals of the exhaust gas temperature sensor (SCR inlet).
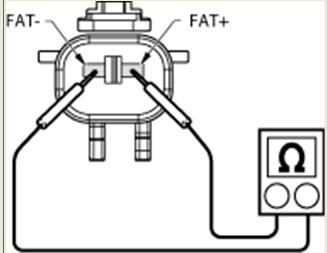
Measuring condition:Starter switch:LOCK
Measurement area:Exhaust gas temperature sensor (SCR inlet) FAT+-FAT-
Standard value:20°C[220Ω]
Do the measurements meet the standard value?
Yes,go to step 16
No,repair or replace exhaust gas temperature sensor.Perform “After-inspection work” of information section.
Step 16:Inspect the DEF pump temperature sensor connector
Check the connection of the DEF pump temperature sensor connector (Looseness and poor contact).
Was any failure found?
Yes,connect securely,repair if needed.Perform “After-inspection work” of information section
No,go to Step 17
Step 17:Check the DTC detected(DCU) with HINO DX2
1.Perform an engine warm-up. (Water temperature: 60 °C {140 °F} or more)
2.Stop the engine.
3.Set the starter switch to the “ON” position.
4.Select [DCU] and check if P0071 has been detected.
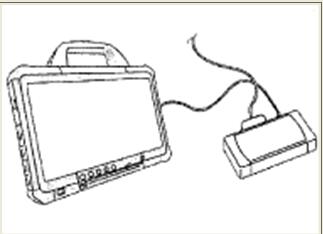
Has DTC P0071 been detected?
Yes,replace the DCU.Perform “After-inspection work” of information section
No,procedure completed.Perform “After-inspection work” of information section
More case for HINO please refer to:HINO Trouble Repair.