This instruction show you guide on how to clear diesel engine,exhaust system and cooling system for CLAAS LEXION 8900-5500 LEXION combine machine.
Related Contents:
CLAAS CDS 7.5 Diagnostic Software 2021 2020 Free Download
CLAAS USB Interface Diagnostic Adapter Package
Claas WebTIC Offline Repair & Service 2024 2015 Free Download
When working in very dry crop and with heavy dust generation, the diesel engine, the exhaust system and the cooling system must be cleaned several times a day.
Areas where oil and dust sticks may indicate a leak.
WARNING!
Hot surfaces – Risk of burns
► Wait for all components to cool down. After that, open the engine cover and the rotary chaff screen.
► Keep a safe distance from hot surfaces.
► Avoid any contact with hot surfaces.
CAUTION!
Cleaning with pressurised water or compressed air – risk of light or medium-grade injury
When cleaning with high-pressure water or compressed air, whirled-up dirt particles may injure e.g. the eyes, the skin or the respiratory tract.
► During the cleaning process, wear protective clothing, protective gloves, safety goggles, face protection and mouth protection.
► Keep a safe distance from the hazard point.
________________________________________
► Switch off and secure the machine.
Check the diesel engine, generators, exhaust system, cooling system and engine output for leaks and dirt accumulations.
► Have leaks repaired by a qualified specialist workshop.
► Clean off dirt accumulations, preferably using compressed air.
► Prevent any dust from entering into the alternator with the compressed air.
► If cleaning with compressed air is not adequate, clean with water and detergent.
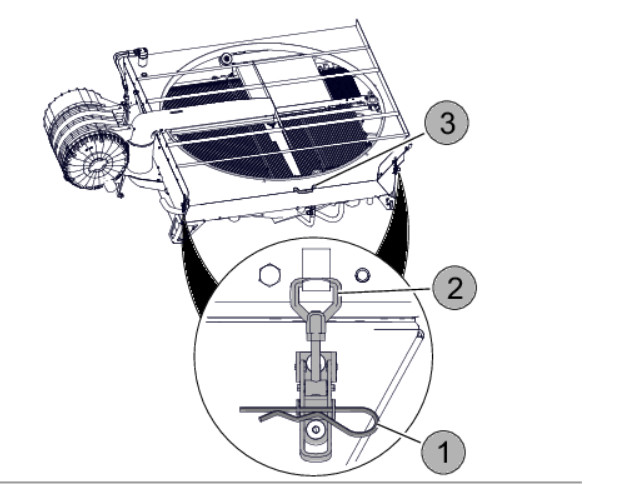

Inside cleaning of cooling system
► Pull off both spring clips (1).
► Open both locking devices (2).
► Fold rotary chaff screen open with handle (3).
► Clean components (4) to (8) with compressed air.
Clean condenser (4) with 5 bar max.!
Do not damage the fins of components (4) to (8)!
► Check rotor (9) for smooth movement and replace the bearing if necessary.
► Close rotary chaff screen with handle (3).
► Close both locking devices (2) and secure with spring clips (1).
Designation
4 Condenser
5 Fuel cooler
6 Charge air cooler
7 Oil cooler
8 Radiator
More repair case for CLAAS,please refer to CLAAS Trouble Repair