This instruction show you guide on how to use CAT ET diagnostic software to perform ECM Self test for Caterpillar machine.
Related Contents:
Caterpillar ET 2024A 2023A 2018A Electronic Technician Software Free Download
CAT Communication Adapter 3 478-0235
Caterpillar Factory 18 Digits Password Service
Accessing the ECM Self Test
Purpose
The ECM Self Test is actually series tests the checks the ability of the ECM to detect faults. During this test, the operator manually connects and disconnects the harness connectors in an attempt to detect hard-wired faults on the harness. The ECM reports whether or not the test passes, and the service tool reports the results.
Accessing
To run the function, select “Diagnostic Tests” from the Diagnostics menu, and then select “ECM Self Test” from the submenu. The ECM Self Test message box displays the following message:
“The Self Test harness must be connected to the ECM for this test to function properly. Please ensure that this connection is secure before continuing. For more information, please refer to the on-line help.”
Note: For instructions on attaching the harness, see “Attaching the ECM Special Test Harness.”
Click OK. The ECM Self Test screen is displayed.
Screen Layout:
The ECM Self Test screen has the following areas:
Status Parameter Area
Located at the top of the screen, this area lists parameters and their values.
Status Line
Located below the Status Parameter area, this area displays messages regarding the process of the diagnostic test.
Instruction area
Located below the Status Line area, this area provides step-by-step procedure instructions for the diagnostic test. The step to be performed appears in black; all other steps are gray.
Buttons
The buttons available in the ECM Self Test screen are:
Start
Cancel/Restart
Attaching the ECM Self Test Harness

ECM Special Test Harness
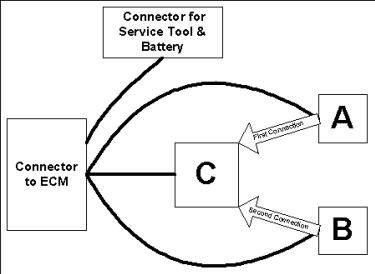
Starting the Test
Ensure that the setup conditions specified in the Instructions area are met. Once these conditions are met, the service tool will place a checkmark in the box to the left of the completed step.
Click the Start button. When the test has completed, the status line will display the results:
If the conditions are not met, the status line states the reason the test was unsuccessful.
If the ECM Self Test is successful, the status line states that the test was successful. The Cancel button is replaced with the Restart button.
Note: If the ECM Self Test fails, a message box displays with the failed test number and a description of the fault modes. (For more information, see “Error Codes”.) Click OK. The ECM Self Test Report dialog box is displayed.
Note: When the ECM Self Test indicates a failure from the ECM, a service report can then be created. This report lists the ECM Summary, the failed test number and fault mode, and customer information.
Canceling the Test
Click the Cancel button. The status line will indicate that the ECM Self test was not successful. The Cancel button changes to the Restart button.
Creating a Report
Purpose
When the ECM Self Test indicates a failure from the ECM, a service report can then be created. This report lists the ECM Summary, the failed test number and fault mode, and customer information.
Instructions
To create a report:
In the ECM Self Test Fault Mode message box, click OK. The ECM Self Test Report dialog box is displayed.
Enter the information in the report. An asterisk (*)indicates required information that must be entered before the report is complete.
When the report is complete, click OK. The Print Document dialog box is displayed.
To exit the ECM Self Test Report dialog box without creating a report, click Cancel. The ECM Self Test screen is displayed.
More repair case for Caterpillar machine,please refer to:Caterpillar Machine Repair